One of the most admirable things about MacOS is that it comes with numerous built-in fonts, and it’s easy to find a font style that catches your fancy. However, we all have our unique tastes and preferences.
So, appealing as they are, it’s not unusual that the built-in Mac fonts may fall short of your expectations. And if you work in sectors like marketing and graphic design, the task of finding a suitable font for your products or projects can be even more daunting. Thankfully, you can download and install more fonts in your Mac and even disable or remove a font that you don’t like.
In this guide, I will walk you through a step-by-step procedure on how to install fonts on Mac.
Downloading the Font
Before you can install a new font on Mac, you’ll first need to find the font and download it. The good news is that the internet teems with hundreds of sources of fonts. We’ve spent the past 2 years finding the best fonts so your don’t have to.
Here are some important factors to consider before downloading a font from the internet;
• Choose a font that matches your project – Fonts are grouped into different categories depending on your industry. Choose a font that falls within your line of work, or simply one that fits your taste. If you can’t seem to find a font that suits the needs of your project, there are online tools that enable you to design your own font.
• Check for compatibility – The font that you choose must be compatible with MacOS for it to be downloadable. To do that, insist on fonts that have any of these file extensions; .ttf, .otf, or .ttc
• Check for License Agreement – While you can readily download most fonts for Mac online, some fonts bar you from using them for commercial projects. In the License Agreement, check for a clause that states “for personal use only,” and avoid using such fonts for commercial purposes.
• Check the website’s reputation – You want to make sure you’re downloading your fonts from a trusted website. To do that, check for user reviews on legitimate review platforms.
If everything looks fine so far, download the font. Most fonts often come in compressed .zip files. For ease of downloading, you can decompress the file by double-clicking on it.
Once the file has been downloaded, proceed to install it on your system.
Installing the Font

The most recommended way to install the downloaded fonts onto your Mac system is by using Font Book. A Font Book is a font-management app that comes pre-installed on your Mac device. Using this tool, you can install fonts on your account as well as on all the accounts on your Mac.
Let’s see what each process entails.
Installing Fonts on Your Account Only Using Font Book
i. Locate the folder that contains the new Mac font using Finder.
ii. Once you’re in the folder, find a file that ends in .ttc, .ttf, or .otf.
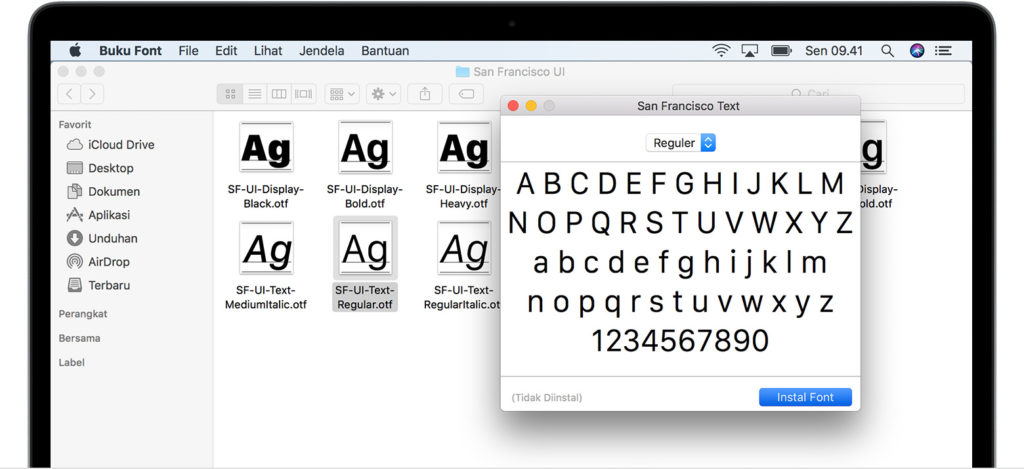
iii. Double-click on the file to run Font Book automatically.
iv. Finish the process by clicking Install Font.
Installing Fonts on All of Your Mac Accounts Using Font Book
i. Find and launch Font Book using Finder or Spotlight.
ii. On the app menu bar located at the top, click Font Book ? Preferences.
iii. You’ll notice that the default location is set to User. Change it to Computer using the drop-down.
iv. Find and open the folder containing the font that you want to install.
v. Look out for a file with the extension .ttc, .ttf, or .otf and double-click on it.
vi. A Font Book pop-up will appear.
vii. Finish the process by clicking Install Font on the pop-up.
Installing Fonts on Mac Manually
While Font Book is such a reliable app for installing fonts on Mac, it’s also possible to manually install your fonts.
To do that;
i. Open Finder.
ii. Click on the “Go” section that appears in the upper menu.
iii. In the drop-down menu, locate “Go to Folder” and then click on it.
iv. In the pop-up window that appears, type “~/Library/Fonts” and then press “Go.”
v. That will bring up the Fonts folder.
vi. Now, drag and drop your unzipped font file into the Fonts folder, and you’re done.
Remember…
No matter how cool your Mac font is, there will come a time when you’ll grow out of love with it. When that time comes, you’ll want to either disable or remove the font.
How to Remove Fonts on Mac OS

The process for disabling or removing a Mac font is more or less similar.
i. Launch Font Book.
ii. Pick the font or fonts that you’d like to disable or delete.
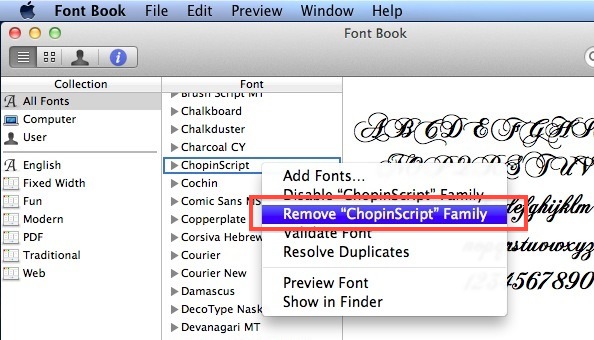
iii. Find the “Disable” or “Delete” button at the top of the screen and click on it.
iv. Finish the process by clicking “Disable” or “Remove” on the pop-up window.

